Friday, April 13, 2012

What Would You Do?


 (For this post, I started writing about my journey in detail and then realized I was telling the story of appointments, chemos, tests, and such. That’s boring. So, I gave myself one page to write and here it is.)

April 13, 2007.  Bad Friday.  Two things happened; 1) my boyfriend (at the time) bought us tickets to see Linda Ronstadt with the Arkansas Symphony; and 2) I was diagnosed with breast cancer.  A few months later, OH!  Linda!!!  It was an amazing performance.  For the first time I heard, ‘Feels Like Home’ and oh how that song spoke to me that night.  Simply put, I was reduced to tears.  To this day, I have never heard a more beautiful song.  Thank you, John.

But yeah, I had breast cancer.  A year later, I had beaten it.  Easy peasy!

Fast forward to February 2009. I had been ‘clean’ (from cancer) for right at a year and was having lunch with my friend and Pink Sister, Jeni SmithJeni saved my life.  Jeni is from Hamburg and was in town so she and I went to lunch at Reno’s in North Little Rock.  I remember she was having a PET scan the next day because she'd 'found something' where the initial cancer originated and was having it checked.  We were talking about recurrence and at some point the conversation went like this:

Me:  What?
JS: Yeah, you have to still check yourself-to make sure it doesn’t come back.
Me:  So you’re telling me that even though I’ve had BOTH my breasts removed, I still need to check myself?
JS:  Yep.

And wouldn’t you know it.  I went home, did a check, and discovered a hard pea-sized area under my left armpit.  Sonofabitch.  In March 2009, my journey of living life as a woman, mother, sister, daughter and friend with Metastatic Breast Cancer began.

It’s been a rollercoaster ride to say the least. In summary:  I have cried, laughed, fallen to my knees in despair, stood strong on the rock of my salvation, cut ties with people who bring me down, rekindled friendships from elementary school and made new friends, I have thrown up waiting on test results, visited places I’d never been but wanted to see, I have experienced anger that I never want to experience again but likely will, in many ways I am a kinder person, I've been hospitalized and had blood transfusions, I have been called a ‘miracle’, and I’ve been frightened of my mortality.  But, because of all of this, I do know one thing:  Yes, I am going to die, but that day is not today.  So what should I do?

Today, I will go with my mom and BFF/sister to have lunch at Ronaldo’s in Hot Springs followed by baths, massages, facials, and foot rubs.  I will re-fill my spring-water jugs.  I will make a memory.  Tomorrow, I will accompany my son as he does his first television appearance as a cook.  (He won’t call himself a chef.)  I will make a memory.  I could go on, but I only have a page.

I can’t even begin to thank the people who have walked along this journey with me so I won’t try.  There are a countless number of people, friends and strangers alike, who have shown me kindness, often undeserved.  This sounds cliché but chances are if you are reading this you have had a positive impact on me at some point in the past 5 years.  From a text to tickets to a trip, none of it has gone unappreciated.

Here is your challenge: Ask yourself—If a doctor told you that you only had a 20% chance of being alive in 5 years, what would you want to do, what  memory would you make?  Go make that happen.

Really.  Now.  Go make a memory.


Tuesday, April 10, 2012

Let Them Eat Cake! And Drink Gravy and Swim in Butter!


The day every woman dreams of; the day your doctor says, “Don’t lose any more weight.”   Or how about this, “You don’t need to lose any more weight and adding 5 pounds is not a bad idea either.”  Today, I heard those magic words.  (I heard them last month too, but not in such a serious tone.) WOW.  Visions of Paula Deen and my mamaw’s friend chicken immediately started doing the jitterbug in my head.  The chicken leg was even wearing a WHAM! shirt.

Of course, the downside to all of this is that I’m not losing too much weight because I eat so healthy or because I visit the gym too much.  In fact, I don’t visit any gym at any time.  I’m losing weight because a side effect of my chemo is the loss of appetite.  Actually, I have no desire to eat.  I will have a hunger pang and ignore it, thinking, “Eh, I’m not craving anything” or “Eh, I don’t want to cook.”  There’s a clinical name for this: Anorexia.  When I was a chubby teenager, I recall wishing I had anorexia.  I wanted it just long enough to lose the right amount weight.  In my mind, once I hit that weight I would just quit being anorexic.  The good news is I don’t have THAT kind of eating disorder-that’s anorexia nervosa.  I don’t have much of a disorder at all, but I still feel like karma just took a bite out of my ass.  You can read about it here: https://www.caring4cancer.com/go/cancer/effects/lesscommon/weight-loss-and-anorexia.htm

Anyhoo.  While driving home, the chicken leg in my head turned into an entire fried turkey and Paula gave herself an insulin shot.  My senses came to me.  I thought to myself, “Self: when you try to lose weight you start by making small changes that reduce your caloric intake.”  Well, that’s not exactly what I thought.  But, I’m thinking I’m going to do the same thing now only opposite—tweak my diet to add a few calories.  For example, when we cook out, I normally eat a hamburger with ketchup, lettuce, and pickle.  If I splurge, which is not often, I treat myself to a cheeseburger with mayo, lettuce, and pickles.  Oh, if I had a dollar for every time I said to someone enjoying their burger with pepper jack, “You just added 7 grams of fat to your meal with that one slice of cheese.”  Well, now I’ll have the cheeseburger too!  Instead of getting unsweet tea or diet coke at Sonic, I’ll get the milkshake I really want!  Instead of forgoing the appetizer, I’ll get it and not feel (quite so) guilty!  I’ll indulge in a ‘leaded’ soda more often.  Hopefully, that will help me maintain my weight but not put on too much.  I'm open to suggestions such as the one my friend Carol gave me:  Drink more wine.

And that, my dear reader, is how you turn lemons into lemonade.  So if you happen to see me gorging myself on an array of fried foods, cheeses and desserts; remember, you should be very glad you are not me.  Really.  I promise.  Seriously.

Oh, and the onc gave me a little pill to take before lunch and dinner that will stimulate my appetite.  Nice.

Sunday, April 08, 2012

Snickers, Tie Dyed Eggs and Deviled Chicken Eggs!

If I recall, I said in my last post that I'd be sharing with you a home made Snickers recipe that found on Pinterest.  Please don't hold me to that because I'm really not sure.  As I'm sure everyone does, sometimes I alter a recipe.  But this not time.  This time, I followed it to the letter.  And do you know what?  It looked JUST like the picture, well, almost.  The problem was, it didn't taste like a Snickers.  It could pass for a Peanut Butter Snickers, but that's not what I was wanting.  But, I think I know what the problem was...do not add peanut butter to the nougat layer.  Maybe that was a typo in her recipe, maybe not.  But if you are going to make these, and you should, omit the PB from nougat layer.  Enjoy!

Can you tell who's is who's?  Fine.  Yes,  mine is on the yellow plate.


TIE DYE EASTER EGGS!
It's Easter!  Time to dye enough eggs for deviled eggs, potato salad, tuna salad, chef salad and more!  I gonna be chowing down on egg recipes all week!  So, I saw on Pinterest (and you did too) that one can make glorious dyed eggs using silk ties.  I had to try this!  So, off to Goodwill I went and bought 4 ties.  I scanned the directions on the website that had the picture that inspired me.


First--I grabbed by BFF who just so happens to be my twin sister, Karen and we deconstructed the ties.  NOTE:  For this work, the ties MUST be 100% silk, otherwise you're gonna end up with white eggs, which I suppose you can then dye in Paas dye.


Then, we cut the ties to a size that would wrap around my egg.  We only made one egg with each tie, but will pack the remaining part with the Easter stuff to have for next year...especially since I think I know how to improve on this tie-dying.  And fine, I don't have "Easter stuff," my mama does and so SHE is packing them away to have for next year.

So, wrap the egg with the tie.  You want 100% of the egg touching the cloth.  100%.  Yeah, that's hard to do and I wasn't successful, but than again, if you look real close no one who has tried this method comes out with a single egg that is 100% tie-dyed.


Gather the material at either the top or side of the egg.  You're going to layer the gatherings as best you can on top of each other.  It has to be TIGHT!  But don't break the egg.  I broke an egg.  Well, it was already wrapped and I dropped it and it broke, but still, I had to start over.


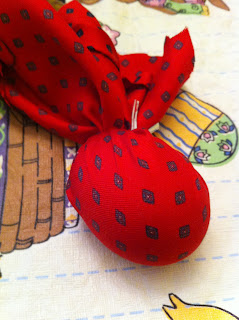
Once you have your eggs wrapped as best you can, use a twist tie to secure the material in place.  I actually tied it once, tugged on the material so more fabric would go through the tie so it would be wrapped even tighter, thus having more tie touching the egg, and then used a second twist tie below the first one.  You'll have to ask Karen how she did hers.


Then take a piece of light cloth and wrap that around the egg and secure it.  I used an old table cloth my mama had lying around.


Once the eggs are wrapped, put them in a pot with enough water to cover them along with 1/4 cup of vinegar.  Bring the pot to a boil and let the eggs boil for 20 minutes.  I suppose you could go longer, but I don't know if it will makes the eggs any brighter.  I'll let you know next year. 


Once 20 minutes has passed, put the wrapped eggs into a bowl of cold water so they can cool.
Once they cool, you can unwrap them!
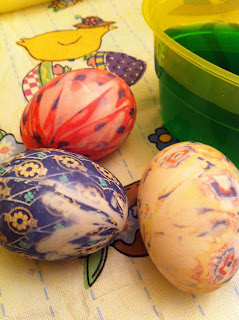
Viola!  As you can see, one side looks FANTASTIC!  The other, not so much.  But if you are displaying your egg in some sort of arrangement you can position it so only the good side is displayed. 


 HOW COOL IS THAT???  Karen's the blue one and mine are the red and yellow ones.   I admit, her's looked better than mine, but not by much.
So, here's the Pinterest picture and our final picture.

I don't know about you, but it's painfully obvious that not every part of any of the eggs above have silk tie touching them...but with positioning.....you barely notice the imperfections.
Here, it's a tad bit easier to see the imperfections, but I think they are pretty regardless!

DEVILED CHICKEN EGGS!!

This may be presumptuous of me, but I'm guessing that you, dear reader, have made or know how to look up a recipe for deviled eggs. 

 Boil your eggs to your liking.  The only big difference, aside from adding olive for eyes and pimento for beaks, is how you cut the eggs.   Cut off the bottom of each egg just slightly so it will stand up--narrow end facing your ceiling.  Because of the way my eggs boiled, I only had to do this to about half my eggs.

Then, cut off the top 1/3 of the egg and gently remove the yolk and put into a bowl.  Once you do that for all the eggs, make your filling.  Add mayo, mustard, salt, pepper, paprika, whatever you normally use and blend.  Then, put the yolk mixture into a cake decorating bag with a top so you can fill the inside of egg.  When you get to the top, keep going and make a ball shape with the yolk mixture.

Meanwhile, have someone (here, my BFF and greatest sister on the face of the planet, Karen) take a few olives, or whatever, and cut them up to make enough eyes for each 'chick'.  I would have used carrot for the beak, but didn't want to waste the pimento so I used those.
Once you have the egg filled, put a top on the egg and then place the eyes and beak.  Yes, it really is that easy.

PINTEREST............................MINE
Not too shabby--and BONUS--they tasted WONDERFUL!!!!

So, that's my Easter in a nut shell, or should I say "egg shell?"  HAR HAR HAR!
It's time for leftovers!!!!!

Regardless of how you celebrate Easter, I hope you had a great one!  Be nice to each other and keep on keepin' on.

Friday, March 09, 2012

You Pin It, I Try It #1


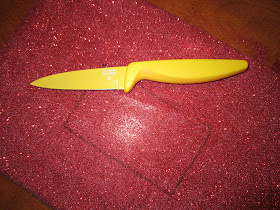
All that stuff on Pinterest looks so damn good, eh?  It's sooooooo pretty!!!!  That appetizing slice of taco pizza doesn't have lettuce and cheese falling off the sides everywhere.  That can only mean one of two things: 1)  There is not enough topping on the pictured slice; or 2) the photographer used some super-hold hairspray or something to keep everything in place.  OK, maybe 3) Their knives are way more sharper than mine.  Case in point:  
Seriously?


You know you see what I'm talking about.  All those beautiful photos on Pinterest coupled with the football shaped cake I made for a Super Bowl gathering inspired me to try things on Pinterest and then let the truth be known...whether it comes out looking like the Pinterest Picture, hereinafter referred to as "PP", or not. 

This first YPI, ITI blog is not my first or even second attempt at making something found on Pinterest.  But it did actually turn out looking like the picture, so I decided to start with it.   Mozzarella Sticks!!!  Sounds yummy!  I love Mozzarella Sticks!  I just hate that the store bought ones have so much sodium.  SPOILER ALERT: This is not the tastiest snack--a little too bland for my taste.  But, it's easy and quick and you make just the amount you need.

Here's the PP:

And we're off! What you need:

Egg roll wraps and the cheese sticks of your choice.  Oh, you'll also need oil and marinara sauce for dipping.

It's actually very easy to roll these.  Lay your cheese stick near one bottom corner of the wrap.  Fold up the bottom part and then tuck in the sides like so:


Since this was a test, I only made three.  I am not stupid and I figured I'd have to tweak the recipe and didn't want to waste food.
Next step:  Fry in about a half inch of oil.  It doesn't take long--really when one side browns, flip them over and by the time the other side browns the cheese will be melted.  

For your viewing pleasure:


SEE!  I told you so!!!


And here's the final result!!!  Looks good, eh???  (Pay no attention to the burnt end.)  Read on...


These might be better with pepper jack cheese or sharp cheddar (but that may not melt as well) maybe by sprinkling some spice of your choice on the cheese stick before wrapping.  Honestly, a pinch of salt would have help tremendously.

As you can see, I don't have fancy colorful plates and bowls, like 99% of PPs have, in which to present my wares, so focus on the food.  The food! Not the plastic blue plate. 


So there you have it!  

Next up: Home made snickers bars!!

POLL:  Do you think mine will turn out this pretty?  And, more importantly, do they actually tastes like a Snickers bar?  I already know...


Wednesday, March 07, 2012

My Square Foot Garden Part 1!!

Welcome to Part 1 of my newest adventure!!!


Follow along with me as I create, sow, and harvest my square foot garden!  What in the world is a square foot garden, you ask?  It's just that-- a garden sectioned into one-foot squares so you can grow a bunch of stuff in a small space.  I'm keeping up with my expenses versus my grocery savings this summer and will give a full report in the fall.
Why would I do this?  Well, I'll tell ya--when I bought this house one of the things I was looking forward to was having a garden.  This will be my second summer in this house and over the past year I figured out that having a garden like my mamaw had--in the yard already present--was not going to happen.  This damn dirt is weedy and rocky and no good for tilling.  So, I did my research and found out that I could have an above the ground garden.  (Who knew that veggies roots don't actually very far down?  I sure didn't!)
So, first things first--I had to get some seeds started indoors.  What fun!  I got carrots, lettuce, broccoli, squash, zucchini, herbs, beans, cucumbers and spinach.  I used the standard Burpee box thingy with dirt included.  Let's take a look at pics from February 29:


Here's what I had a couple of days later:


A BEAN SPROUT!!!

Here's what they look like TODAY,  March 7:  


They are HUGE I tell ya, HUGE!!!!


Next, my pops had to build the garden box because I had to get the dirt ready for planting.  Why?  I heard from a friend that I needed to go ahead and get the dirt in the box and to start 'turning' the dirt weekly.  Why?  I have no idea, but my mama says it's so the dirt can get warm.
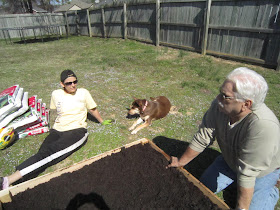
Anyway--pops had to build the box.  It is a 4ftX4ft untreated cedar box with reinforcements.    There was no map, instructions or guides, he's just clever like that. If you want a pre-made kit, we'll sell you one with all the wood cut to the proper sizes; all you'll need to do is put it together with included screws.  Seriously.   I moved it to it's designated spot in my backyard (the spot that gets the most light) and put that black stuff that is supposed to keep weeds out (but doesn't) at the bottom.  We'll even throw in the black stuff for FREE if you order a kit.


                        Viola!
**Anyone who knows me, knows I'm not good at math.  If I could do math I'd be a doctor instead of an attorney.  I say this so you understand why there are so many extra bags of dirt in the next set of pictures.  I thought a 4X4 would need 16 cubic square feet of dirt.  And as it seems, that is certainly true SO LONG AS the garden is a foot deep.  Mine is six inches deep, so I only needed 8 cubic feet of dirt.  

I actually used a combination of peat moss, top soil and garden soil and Zachary even pitched in to help:


Top Soil/ Peat Moss mix
Garden Soil

Whew, I'm all tuckered out!  (Pay no attention to the bags of dirt behind me.) 
Here are the empty dirt bags:  

I'm now in the waiting period to transplant, but I am already looking forward to harvesting my herbs and veggies!  

TO BE CONTINUED...

Next up:  You Pin It, I Try It #1!!!


Wednesday, February 22, 2012

Kathy's Quick Red Beans and Rice

Mardi Gras always makes me crave red beans and rice.  Alas, today I was busy playing work stuff catch up and I didn't get started menu planning until late, so I created a fast version using canned beans.  No crock pot needed.


I stared with a few ingredients and I bet you already have them on hand.


1-2 tsp bacon grease or other oil
1 celery stalk, cut into slivers
16 oz. turkey smoked sausage, cut into half-moon slices
1/2 tsp dried thyme
1/4 tsp dried sage
2 bay leaves
1 minced garlic clove
1 can chicken broth
2 cans red beans


In a sauce pan, start by sauteing your celery in the oil.  Then, add your sausage to brown, about 5 minutes.  Add the garlic and cook for another minute.  Next, add all your spices.  You can also use red pepper flakes or Old Bay Seasoning if you wish.  Actually, I guess you could do anything you wanted; I couldn't stop you.


Add chicken broth and beans.  I drained one can of the beans but did not rinse them.  Then, with a potato masher I did three mashes to brake up some of the beans (but not too many) to help thicken the sauce.


Bring to a boil and then let it simmer while you prepare your rice.  Tonight, I made 4 cups because TIME SAVING TIP:  I wanted left overs to use tomorrow.  I used my pressure cooker for the rice.  YAY!


Assemble by using the rice-bean ratio and sauciness to your personal liking.


 Easy Peasy!


I wish I had a colored bowl...and next time I am going to use coconut milk and a pepper to make my rice for a Jamaican flavor.

Monday, February 13, 2012

What To Do With Leftover Christmas Wrapping Paper

I bought some very pretty red sparkly wrapping paper this past Christmas season.  But, when I went to wrap my first gift with it, the scotch tape would  not stick to it, so it was pretty useless. You know I didn't toss it, but rather, I saved it and put it up in attic with the rest of my wrapping paper and decorations after the holidays.


THEN...(and this is why I save things--but am not a hoarder)


Christian had to make a valentine mailbox for his school Valentine's Day Party...well, I had to make it.  I guess he could have helped but that didn't occur to me until now.  Anyway, as soon as I read the note,  I knew exactly what I was going to do:


Since I was using a shoe box, I didn't need tape, I needed glue.  It was SUPER EASY!  


First things First!!!  Gather your supplies:


A box, scissors, glue, paper and the obligatory glass of wine--wrapper's choice. 


To start, cut your paper as you would any box you were gift wrapping, except you don't have to go all the way around the width of the box twice, but just enough to wrap around the edges of the box.  


Note how I snipped the paper so it would fold over without it tearing.


Then just start wrapping:  


Next: the box.  Really, wrap it just like a present.
Use paperclips where needed to help the glue to set around the box lip.


Then, it's back to the lid.  Cut out the slot--make it big enough for small Valentine gift bags to fit through.


Now for the best part.  DECORATE!  We used foam stickers and 3-D metallic glue to write his name on the box.  The stickers stuck fairly well, but I needed to use this for longer than a day, I'd would glue them onto the box.


 And voila!  There you have it.  The coolest Valentine Mail Box on the planet!


I hope you get a chance to try this soon!  And, I hope it comes home tomorrow filled all sorts of great goodies for Christian!


Until next time...