Can you tell who's is who's? Fine. Yes, mine is on the yellow plate.
TIE DYE EASTER EGGS!
It's Easter! Time to dye enough eggs for deviled eggs, potato salad, tuna salad, chef salad and more! I gonna be chowing down on egg recipes all week! So, I saw on Pinterest (and you did too) that one can make glorious dyed eggs using silk ties. I had to try this! So, off to Goodwill I went and bought 4 ties. I scanned the directions on the website that had the picture that inspired me.
First--I grabbed by BFF who just so happens to be my twin sister, Karen and we deconstructed the ties. NOTE: For this work, the ties MUST be 100% silk, otherwise you're gonna end up with white eggs, which I suppose you can then dye in Paas dye.
Then, we cut the ties to a size that would wrap around my egg. We only made one egg with each tie, but will pack the remaining part with the Easter stuff to have for next year...especially since I think I know how to improve on this tie-dying. And fine, I don't have "Easter stuff," my mama does and so SHE is packing them away to have for next year.
So, wrap the egg with the tie. You want 100% of the egg touching the cloth. 100%. Yeah, that's hard to do and I wasn't successful, but than again, if you look real close no one who has tried this method comes out with a single egg that is 100% tie-dyed.
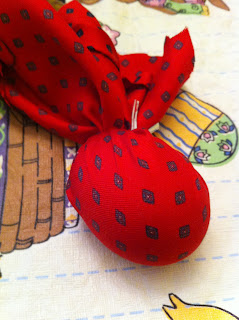
Gather the material at either the top or side of the egg. You're going to layer the gatherings as best you can on top of each other. It has to be TIGHT! But don't break the egg. I broke an egg. Well, it was already wrapped and I dropped it and it broke, but still, I had to start over.
Once you have your eggs wrapped as best you can, use a twist tie to secure the material in place. I actually tied it once, tugged on the material so more fabric would go through the tie so it would be wrapped even tighter, thus having more tie touching the egg, and then used a second twist tie below the first one. You'll have to ask Karen how she did hers.
Then take a piece of light cloth and wrap that around the egg and secure it. I used an old table cloth my mama had lying around.
Once the eggs are wrapped, put them in a pot with enough water to cover them along with 1/4 cup of vinegar. Bring the pot to a boil and let the eggs boil for 20 minutes. I suppose you could go longer, but I don't know if it will makes the eggs any brighter. I'll let you know next year.
Once 20 minutes has passed, put the wrapped eggs into a bowl of cold water so they can cool.
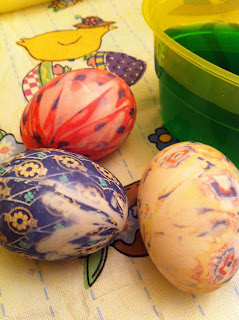
Once they cool, you can unwrap them!Viola! As you can see, one side looks FANTASTIC! The other, not so much. But if you are displaying your egg in some sort of arrangement you can position it so only the good side is displayed.

HOW COOL IS THAT??? Karen's the blue one and mine are the red and yellow ones. I admit, her's looked better than mine, but not by much.
So, here's the Pinterest picture and our final picture.
 |
| I don't know about you, but it's painfully obvious that not every part of any of the eggs above have silk tie touching them...but with positioning.....you barely notice the imperfections. |
 |
| Here, it's a tad bit easier to see the imperfections, but I think they are pretty regardless! |
DEVILED CHICKEN EGGS!!
This may be presumptuous of me, but I'm guessing that you, dear reader, have made or know how to look up a recipe for deviled eggs.
Boil your eggs to your liking. The only big difference, aside from adding olive for eyes and pimento for beaks, is how you cut the eggs. Cut off the bottom of each egg just slightly so it will stand up--narrow end facing your ceiling. Because of the way my eggs boiled, I only had to do this to about half my eggs.
Then, cut off the top 1/3 of the egg and gently remove the yolk and put into a bowl. Once you do that for all the eggs, make your filling. Add mayo, mustard, salt, pepper, paprika, whatever you normally use and blend. Then, put the yolk mixture into a cake decorating bag with a top so you can fill the inside of egg. When you get to the top, keep going and make a ball shape with the yolk mixture.
Meanwhile, have someone (here, my BFF and greatest sister on the face of the planet, Karen) take a few olives, or whatever, and cut them up to make enough eyes for each 'chick'. I would have used carrot for the beak, but didn't want to waste the pimento so I used those.
Once you have the egg filled, put a top on the egg and then place the eyes and beak. Yes, it really is that easy.
Not too shabby--and BONUS--they tasted WONDERFUL!!!!
So, that's my Easter in a nut shell, or should I say "egg shell?" HAR HAR HAR!
It's time for leftovers!!!!!
Regardless of how you celebrate Easter, I hope you had a great one! Be nice to each other and keep on keepin' on.


I am sooooo doing tie-dyed eggs next year!
ReplyDelete